It is also a guide to replacing the air conditioning drive belt and the water pump drive belt. If you are going to replace the thermostat, I suggest that you change the belts whilst you are at it, as you have to strip the engine back to reveal them anyway.
This post may contain affiliate links. Please read my disclosure for more info.
Symptoms of a Faulty Thermostat
Since I bought my car the mpg had been gradually worsening, from an initial mpg of 38 down to 32.
The car was also not getting up to temperature any where near quick enough. The car should be up to full running temp in around 3 - 4 miles, with the gauge sitting at the 12 o'clock position. The OBC (on board computer) can be manipulated to show the current engine temperature. The ideal temp range is 88 - 92. Mine was reaching 86 after 12 miles of driving.
Instructions to access the hidden OBC functions for an E46 BMW 3 Series:
- Hold the trip reset stalk, the left of the two stalks in the dash dial cluster, while turning ignition to the on position
- The OBC should now show "Test" in the top left
- Press the trip reset stalk to scroll through and select function 19.0, this unlocks all the features
- Wait for OBC to show "Off"
- Press the trip reset stalk quickly once
- Then without pausing press the trip reset several times to select function 7, which shows temperature and speed
Tools Required
For doing both the thermostat and the belts you will need the following. Items marked with a * are all that is needed if you just want to change the belts.
- 32mm Viscous fan spanner *
- 32mm Spanner *
- 24mm Socket *
- 16mm Socket *
- 5mm Allen key, or Allen head socket bit *
- 10mm Spanner or socket
- 8mm Socket
- 7mm Socket
- Pliers
- Torx T20 bit (or one size larger, can't remember)
- Torx T45 bit
- Torx female socket set (didn't check the size when I did it)
- Screw driver set
Parts Required
You will also need 5L of coolant. BMW sell 1.5L bottles at £9.90, you'll need 4 bottles...
...if you don't fancy paying that price for coolant, I used (and would highly recommend) Comma Xstream G48, which is BMW approved.
Finally you will need 5L of de-ionised water. I got some made up for me through a friend, but you can get it in various shops; Tesco, Halfords and Amazon.
Disclaimer: Any information given in this guide is to be used at the readers own risk. I take no responsibility for injuries to the reader or damage to their vehicles. If this guide is followed correctly, no harm should occur to either the reader or the car. If followed incorrectly it could cause injury or damage to the car.
Please read through the entirety of this guide prior to undertaking any work, and do take care when following this guide.
I used a few BMW TIS documents for reference when carrying out this work, for your information I have linked to them all below:
- BMW TIS - 11 53 000 Removing and installing or replacing coolant thermostat (M57)
- BMW TIS - 11 28 050 Replacing A/C compressor drive belt (M57 / M47TU)
- BMW TIS - 11 28 010 Removing and installing/replacing alternator drive belt (M57)
- BMW TIS - 17 00 005 Draining off and topping up coolant (M57)
Once you have sourced all of the parts listed above, you should have a pile something like below.


Step 1
As the thermostat is coming off, it is necessary to drain the coolant. Start by jacking the car up making sure it is jacked level to allow all of the coolant to be drained out.If you are just doing the drive belts you could do this work with the car on the floor.
Step 2
Using the 5mm Allen key, remove the engine plastics and intake ducting.So your engine bay goes from looking like this:

To this:

Step 3
With the engine covers removed and the car jacked up, remove the fan and shroud. To do this take the Torx T20 bit (it could be the next size up, I remember changing to another one as it wasn't quite a good fit) and remove the fixing in the top of the shroud on the drivers side.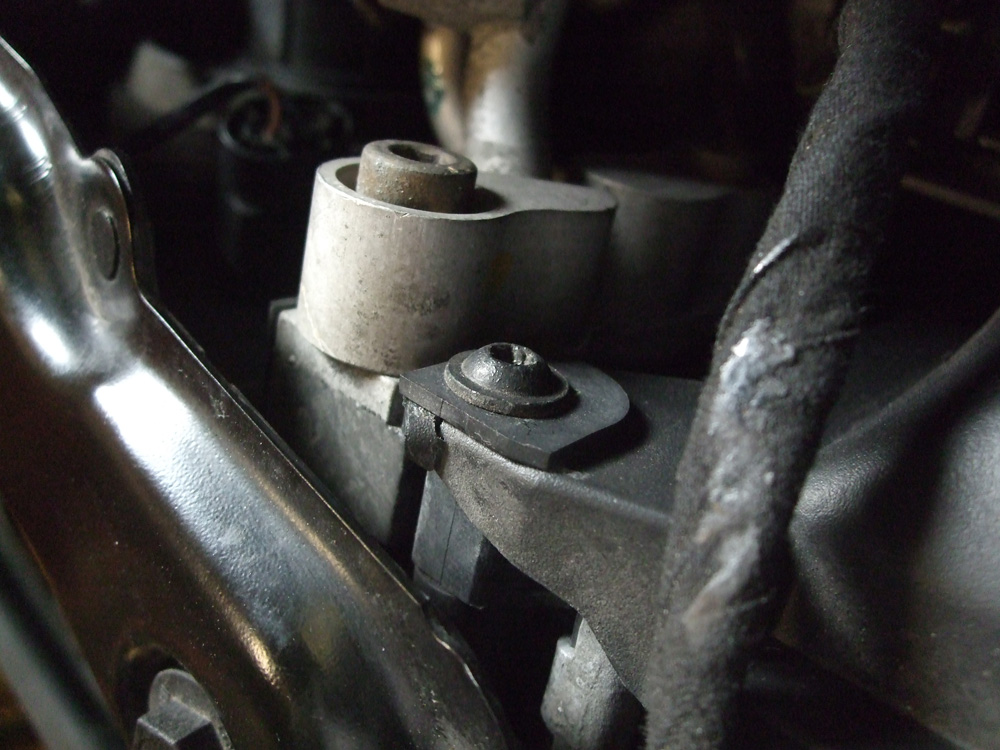

On the passenger side at the top is a plastic clip, pull the centre out (this is quite tricky, mine wouldn't budge) then pull the rest out.


To remove the fan, look straight down and locate the two nuts, put your 32mm viscous fan spanner on the one nearest the engine (thin one) and your normal 32mm spanner on the larger one nearer to the fan. This is a left hand thread, so to undo turn the nut clockwise.

All that is left to do is remove the two wiring plugs in the shroud on the drivers side, the top one just slides out upwards, but the bottom one clips out. On the fan side of the shroud (inside face) there is a rectangular hole, inside it you will feel the clip holding the lower wiring plug, tweak it and the plug should come free. It makes more sense when you are doing it yourself.

After this the fan and shroud should just pull away.
Step 4
Skip to Step 12 if you are just replacing your drive belts.With the fan and shroud removed, you need to go underneath and remove the following;
- front plastic engine guard - several full turn fixings - remove using short posi screw driver
- * large metal sump guard - 8x set screws, remove using 16mm socket, and one self tapper into the heatshield removed using a 8mm socket
- * two guards further back (one metal one plastic) - removed using a posi head screw driver and a 8mm socket
- * primary cat flexi section heat shield - remove using a 8mm socket.
* Marked items need only be removed if you wish to drain coolant from the engine block, read step 5 to decide if you wish to do this.
Step 5
Once these guards were off I started draining the coolant using the;- radiator drain plug, located at the bottom of the radiator on the passenger side
- expansion tank plug, located at the bottom of the expansion tank, I had to remove the hose from the intercooler (passenger side) to the egr valve to be able to get at the plug
- engine block drain plug, located on the block up and behind the primary cat section. I didn't get a lot out of the block, about 1L, so for the hassle of getting the cat off just to get to this plug, it's not really worth it.
You might want to squash the coolant tubes to speed up the coolant expulsion, it doesn't exactly flood out.
Here you can see the radiator drain plug, and at the top you can just about see the blue of the expansion tank plug.

And this is the engine block drain plug.

I was expecting to get out about 10 litres of coolant, but in actual fact it was no where near. I actually got out about 6 litres, of what looked like discoloured water. It had no smell like antifreeze so I was happy to know that the right mix would be going back into the system.

Step 7
With the coolant drained you need to remove a few things from the engine bay to give you better access to the thermostat fixings. I had to undo the top of the intake snorkel and move it over a bit. Do this by undoing the two 5mm Allen head bolts.
You will also have to remove the EGR pipe. The EGR pipe has several fixings,
- 2x Torx T45 head bolts into the exhaust manifold
- 1x Hex bolt on the centre bracket - remove using a 10mm spanner or socket
- 1x Hose clamp into the EGR valve, remove using a flat head screw driver

In this picture the bolt has been removed, I've just held the spanner next to the weldnut the bolt goes into.


And here is the EGR pipe removed.

I'd recommend at this point you also take the time to remove the EGR valve and clean it and potentially perform an EGR valve bypass.
Step 8
Now you can get enough access room to get at the 4x Torx head bolts holding the thermostat to the water pump. You will need your female type Torx sockets for this job. Unfortunately I haven't got any pictures of this bit. But you can see in this diagram where it should locate and where the fixings are.
Step 9
The thermostat really didn't want to come away from the tubing connected to it, I found I had to undo the two bolts securing the plastic piping to give enough movement in the assembly to get a bit of leverage. Remove the two bolts I'm pointing at below. One is behind the oil filter, and one is underneath the EGR valve.

Step 10
With the thermostat removed I compared new with old. They differ in design quite a lot, the old one has a considerably more substantial spring. The new one also has a little copper pip that acts as a tiny valve.Old on the left, New on the right in the two pics below.


Old thermostat

New thermostat


You will need to salvage the o ring from the old thermostat, as well as a plastic washer. Both are in the end that connects to the solid tube that you had to remove two fixings from in step 9. They are parts 8 and 9 in the diagram below.

To get them out, insert a small screw driver into the two small rectangular holes in the thermostat, then lever the tabs out. Once out, give them a thorough clean and insert them into the new thermostat.

Step 11
Fit the new thermostat before doing any other work to avoid getting anything in the engine block/water pump through the open hole where the thermostat sits.Step 12
If you are not replacing your belts skip to Step 16.You can now start replacing your belts. You will need to remove the AC drive belt first, but fit the new AC drive belt last.
To remove the AC drive belt, take a 16mm socket or spanner, and turn the nut below clockwise until the tensioner is slack enough to get the belt off. This tensioner is not on a spring back mechanism so don't worry about it snapping back on your hands.

Step 13
With the AC drive belt still removed, move onto the water pump drive belt. Use a 24mm socket or spanner on the tensioner. Be very careful with this one, as it is on a spring back mechanism and it will cause a very bad day if you trap anything in it. Get someone else to help you with this bit. Place the 24mm socket or spanner on the tensioner nut, turn it anticlockwise and hold in a position where the belt is slack enough to remove. Once removed you can let go of the tensioner for a minute while you grab the new belt.
Step 14
Put your new water pump belt back on first. I have made a diagram of how it should go, which you can see below. It is quite tricky to get back on as there is so many loops and turns. Be sure to get it right, I would advise familiarising yourself with its path as well as studying this diagram.
Step 15
Put your new AC drive belt on and re-tension it by using the 16mm socket again, this time turning it anticlockwise until the belt is at the right tension. So I believe, between contact points the centre of the belt should be able to turn 90° when it is at the right tension.Step 16
With both belts back on, you can now replace the fan and shroud.Before putting the fan and shroud back on, as always with anything I take off and replace with my cars, I cleaned them up. Unfortunately I only got pictures of the fan cleaned up.


If you are just changing the belts you are now finished, and can replace all engine covers and intake ducting.
Step 17
With everything back together, mix up your coolant using a 50 / 50 mix of antifreeze and distilled water. My system took about 7 litres, 1 litre more than came out, so it was obviously a little low before.Before filling the system up, remove these two bleeding screws. One right next to the expansion tank, and one just below the EGR.


Both can be seen in this wider picture.

Step 18
Place a rag next the bleed screw hole under the EGR, you do not want the antifreeze getting on your new water pump belt. Make sure you have replaced all the drain plugs. Then start filling up the coolant system by pouring into the expansion tank where the yellowy float is. Pour at a constant rate, not glugs at a time. Keep filling until a steady stream comes out of the bleed screw underneath the EGR, then stop immediately and replace both bleed screws.Continue then to fill until the float is correctly positioned according to the diagram on the expansion tank.
Step 19
Replace all panels, plastic guards, intake ducting, pipes etc and then turn your car on and let it heat up to full temperature. Turn the car off then allow it to cool back down. Check the coolant level and top up if required.You should now have completed the job. I took mine for a drive and it warmed up as it should in around 3 miles.
6 Comments
Excellent info. Just needed a refill after changing auto box oil cooler. Thanks for taking the time.
ReplyDeleteMany thanks for this information, am starting the job tomorrow. Ben
ReplyDeleteGood read, this is going to help me this coming week! I know its a very old post but I dont suppose you ever changed the water pump did you? All the guides I find are the other type of pump
ReplyDeleteThanks Richard, hopefully your job goes ok this week.
DeleteActually I did, but I haven't got round to typing it up (I'm a little behind!)
Basically, once you've got the thermostat off (as per the guide above), it's only 4 more M10 bolts and you've removed the water pump too. You may have to undo the ducting that goes to the air flow meter (MAF) to get enough wiggle room to remove the pump though.
Hope this helps,
Cheers,
Andy.
Thanks Andy, the job was a lot simpler than it looks thanks to your guide. I managed to get both the pump and thermostat out as a whole without removing the EGR pipe, so if your updating it at some point you could probably add in that you can skip that step if your replacing both together.
DeleteI've still got the reassembly to do and that paper gasket looks to be well stuck. Not the best job for this weather!
Thanks for the guide!
This sounds like an informative DIY project.
ReplyDeletePost a Comment
Let me know what you think by leaving a comment below.